��R16FileSharing.html��������������������������������������������TEXTMOSS���������������������R���R�������������������������j���
Rumpus 1.3 - User's Guide: Adding Users Via File Sharing
Rumpus 1.3 User's Guide
Adding Users Via File Sharing
If you want to make files available to anonymous users only, then you don't need
the services of the Mac OS's File Sharing because Rumpus won't require username
and password information for users. However, to provide mixed access or access to
registered users only, you'll need to enable File Sharing and manage users via
the Users & Groups Control Panel. While we can't show you everything you need to
know to manage File Sharing in this manual, let's review the basic steps to help
get you started.
Activating File Sharing
-
The first step in providing File Sharing service on the Mac OS is to identify the
owner's username and password and to identify your Mac on the network using a
unique name. To get started, open the Control Panels and choose Sharing Setup
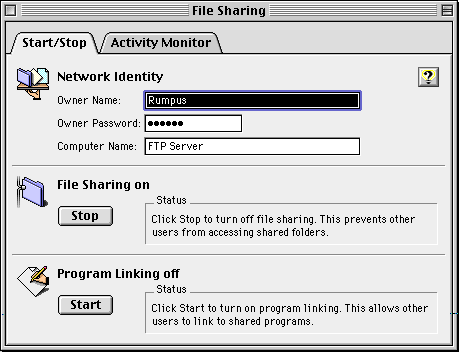
under Mac OS 7.x, or File Sharing for Mac OS 8 (shown in Figure 19).

Figure 19: The Sharing Setup Control Panel.
Follow these steps to complete the first phase of configuring your Mac for File
Sharing.
- Choose a name up to 32 characters in length for the owner (administrator) of the Mac that will provide File Sharing services. This person will have full access when logged in via AppleShare.
- Choose a case-sensitive password up to 8 characters in length.
- Choose a name by which the Mac will be known on the network. This name can be up to 32 characters in length, and will appear in alphabetical order in the Chooser when AppleShare is selected.
- Click the File Sharing Start button to begin File Sharing, which takes several seconds to initialize. It takes longer to start File Sharing on Macs with larger hard drives or large numbers of files and folders. To stop File Sharing, click the Stop button. The Program Linking button can be ignored for the purposes of configuring Rumpus.
- Close the Sharing Setup Control Panel when finished.
Users & Groups
-
The next step is to create users and groups of users for whom access to your Mac
is to be granted. To get started, open the Control Panels and choose Users &
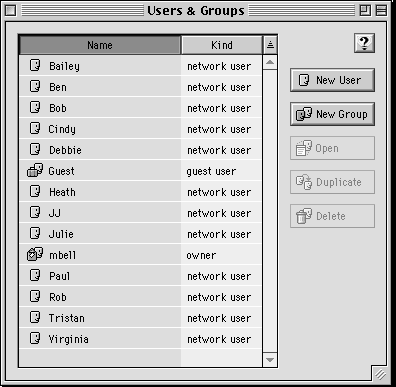
Groups, shown in Figure 20.

Figure 20: The Users & Groups Control Panel.
Double clicking on the owner icon will display the owner's login settings dialog.
You may want to check "Allow user to see all disks" option, which will allow you
full access to the entire Rumpus FTP folder hierarchy. Please note that anyone
who logs in as the owner will have full access to the entire directory structure,
even if they are not explicitly granted privileges in the sharing permissions.
You can avoid this situation by not selecting this option and sharing only
portions of the volume instead.
To add new users, open the Users & Groups Control Panel and select "New User"
from the "File" menu, or press Command-N. You will need to create a user here in
order to allow the user to access a folder using File Sharing.
Selecting Files & Folders
-
The final step is to select a folder from which files are to be shared via FTP.
As we mentioned earlier, Rumpus shares files from a common directory much like a
Web server, rather than from individual folders that may or may not belong to a
specific user. Like UNIX systems, Rumpus identifies a specific folder from which
files, folders, and aliases are to be served to FTP users. The final step in
configuring File Sharing to work in conjunction with Rumpus is to set the sharing
privileges for the shared FTP folder. To do so, follow these steps.
- Locate the Rumpus FTP folder, selected in the Basic configuration tab by
clicking the "FTP Folder" button.
- Select the folder by clicking on it once, then choose "Sharing..." from the
"File" menu.
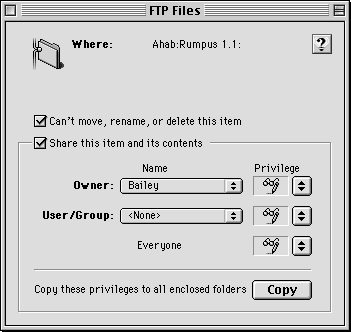
- The sharing properties dialog box, shown in Figure 21, will open and display
several configuration options.

Figure 21: The Sharing properties dialog box in MacOS 8.
- Check the "Share this item and its contents" box. This option won't be
available if the FTP folder is inside a folder or volume that is already shared.
In this case, the FTP folder is already shared.
- Assign yourself as the owner of the folder in the "Owner" drop-down list.
Choosing another user will enable that person to change the sharing privileges
for this folder.
- In the "User/Group" drop-down list, select the user or group of users that
you would like to grant access to the folder.
- The "Everyone"checkboxes allow you to provide all users (anonymous or
registered) access to the folder. To completely disallow access to a folder by
anonymous users, be sure to turn all three checkboxes off.
- Do not click the "Copy these privileges to all enclosed folders" button
unless you really intend to do so. This is important to remember because the FTP
Files folder may contain folders with varying degrees of access privileges for
multiple users.
- When you are done, close the window.
You may change the sharing privileges for any folder or sub-folder within the FTP
root hierarchy so that users will not have access to individual folders. However,
even secured folders will be visible to users without access rights when they are
in a folder in which they do have access privileges. In other words, a user may
see that a folder they don't have access to exists, even though they cannot go
into the secured folder. The same holds true for access to folders and volumes
that have been aliased, described next.
[ Previous | Table Of Contents | Next ]
Copyright © 1997-9 Maxum Development Corporation
http://www.maxum.com/
��������������������������������������������������������������������������������������������������������������������������;��������{��8���|����8p���,����R16FileSharing.htmllDemo1-01 11��TEXTMOSS���8���������������������<������������������������!��||�x|��t,��X@���;�,~H���;�,l|��t,��o@���;���H��(|��t,��xA���|��t,��XA���;��
H���;���|��t,��d����;���A���|��t,��i������������������(�2����������������������������������������������������������������������������������������������������������� 

